
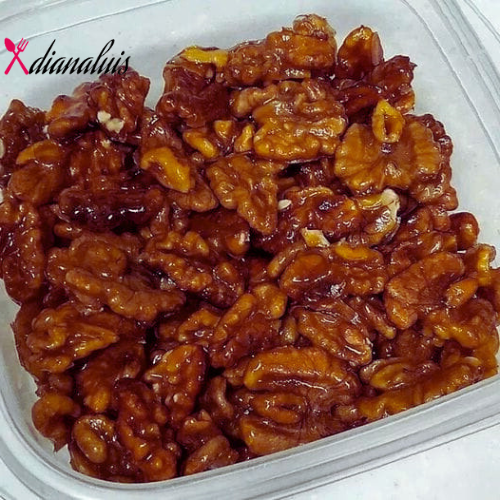
Looking for a quick and delicious treat? These 5-Minute Caramel Nuts are the perfect solution! With just a few simple ingredients and a skillet, you can whip up a sweet, crunchy snack that’s great for munching, topping desserts, or gifting. Whether you’re craving something sweet or need a last-minute party treat, these caramel-coated nuts are sure to impress!
Ingredients:
- 1 cup nuts of your choice (e.g., peanuts, almonds, cashews, walnuts)
- 1/2 cup granulated sugar
- 2 tablespoons water
- 1 tablespoon butter
- 1/2 teaspoon vanilla extract
- Pinch of salt
Instructions:
- Prepare a microwave-safe bowl and add the nuts to it. You can use one type of nut or a mix of your favorites.
- In a separate microwave-safe bowl, combine the granulated sugar and water. Stir well to make sure all the sugar is moistened.
- Place the bowl with the sugar-water mixture in the microwave and cook on high for about 1-2 minutes until the sugar is fully dissolved. The time may vary depending on your microwave’s power.
- Carefully remove the bowl from the microwave using oven mitts or a towel (it will be hot).
- Add the butter, vanilla extract, and a pinch of salt to the sugar-water mixture. Stir well to combine everything into a smooth caramel sauce.
- Immediately pour the hot caramel sauce over the nuts in the other bowl. Use a spatula or spoon to quickly coat all the nuts with the caramel.
- Spread the caramel-coated nuts on a parchment paper-lined tray or plate, separating them as much as possible.
- Let the caramel nuts cool and set for a few minutes. The caramel will harden, creating a delicious crunchy coating on the nuts.
- Once completely cooled and set, transfer the caramel nuts into an airtight container for storage.
Enjoy your homemade Caramel Nuts as a delightful snack or gift them to friends and family. Remember, the caramel will be very hot, so be careful when handling it during the process. Always use microwave-safe bowls and oven mitts to avoid burns.


